您现在的位置是:网站首页> 编程资料编程资料
在ASP.NET 2.0中操作数据之四十:自定义DataList编辑界面_自学过程_
![]() 2023-05-24
328人已围观
2023-05-24
328人已围观
简介 在ASP.NET 2.0中操作数据之四十:自定义DataList编辑界面_自学过程_
导言
DataList的编辑界面由EditItemTemplate里的标记语言和web控件定义。在目前为止所做的DataList编辑功能的例子里,编辑界面都只包含TextBox。在前面一章里,我们通过添加验证控件来增加了用户体验,提高了可用性。
EditItemTemplate可以包含除了TextBox以外的很多控件,比如DropDownList, RadioButtonList, Calendar等。和使用TextBox一样,使用这些控件自定义编辑界面时,步骤如下:
为EditItemTemplate添加控件.
使用绑定语法将相关的字段值赋给控件的属性.
在UpdateCommand事件处理里, 编程访问web控件的值,并将它传给相关的BLL的方法.
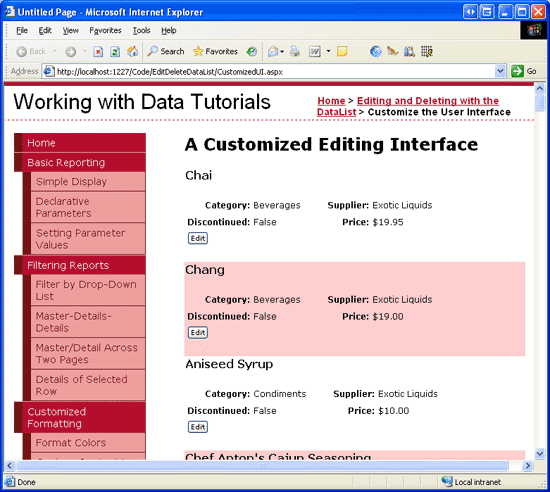
本章我们将为DataList创建一个更丰富的编辑界面,它将包含DropDownList和CheckBox。我们将创建一个列出product信息的DataList,用户可以更新它的name,supplier,category和discontinued status。见图1。

图 1: 编辑界面包含一个TextBox, 两个 DropDownLists和一个CheckBox
第一步: 显示Product 信息
在创建DataList的编辑界面前,我们需要先创建一个只读界面。先打开EditDeleteDataList文件夹下的CustomizedUI.aspx页,拖一个DataList进来,将ID设为Products。通过DataList的智能标签,创建一个名为ProductsDataSource的ObjectDataSource,用ProductsBLL类的GetProducts方法配置它。象前面一章一样,我们将直接通过BLL来更新product信息。在UPDATE,INSERT,DELETE标签里选择None.
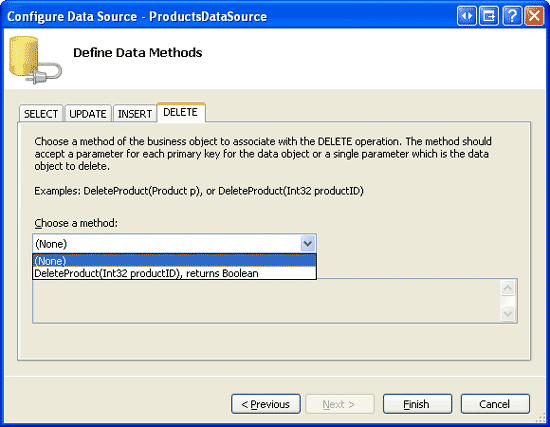
图 2: 在UPDATE, INSERT, DELETE 标签的下拉列表里选择 (None)
配置完ObjectDataSource后,Visual Studio会自动创建默认的ItemTemplate,列出每个字段的值。将product name用
表示,并添加一个Edit button,确保将它的CommandName属性设为 “Edit”. 我的标记语言如下:
Category: Supplier: Discontinued: Price:
Category: Supplier: Discontinued: Price:
上面的标记语言用
表示product name,4列的

| Name: | |||
| Category: | Supplier: | ||
| Discontinued: | Price: | ||
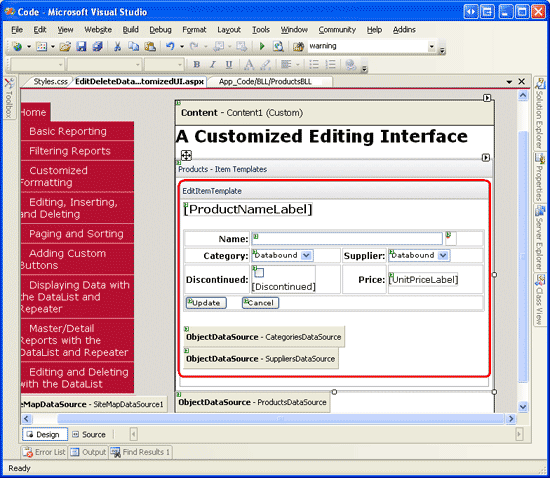
图 7: 编辑界面和只读界面的展示差不多
第三步: 创建 EditCommand和CancelCommand Event Handlers
现在在EditItemTemplate里除了UnitPriceLabel外还没有绑定语法(从ItemTemplate复制过来的代码)。在添加绑定语法前我们首先为DataList的EditCommand和CancelCommand创建事件处理。EditCommand事件处理的目标是为了将Edit button被点击的item展示为编辑状态,而CancelCommand的目标是将DataList返回到编辑前状态。见下面的代码:
protected void Products_EditCommand(object source, DataListCommandEventArgs e) { // Set the DataList's EditItemIndex property and rebind the data Products.EditItemIndex = e.Item.ItemIndex; Products.DataBind(); } protected void Products_CancelCommand(object source, DataListCommandEventArgs e) { // Return to DataList to its pre-editing state Products.EditItemIndex = -1; Products.DataBind(); } 完成这些后,点击Edit button会进入编辑界面,点击Cancel button会返回只读模式。见图8。由于现在还没有为编辑界面添加绑定语法,TextBox是空白的,CheckBox 未被选中,两个DropDownList里都是第一个item被选中。
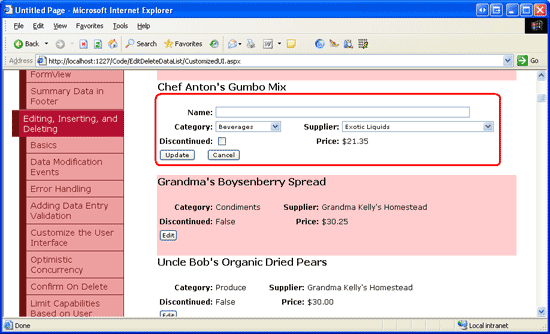
图 8: 点击Edit Button显示编辑界面
第四步: 为编辑界面增加绑定语法
为了让编辑界面显示当前product的值,我们需要使用绑定语法将字段的值赋给web控件。绑定语法可以通过选择web控件的智能标签的“Edit DataBindings”或者直接添加声明语法来实现。
将ProductName字段的值赋给ProductName TextBox的Text属性,CategoryID和SupplierID字段赋给Categories和Suppliers DropDownList的SelectedValue属性,Discontinued字段赋给Discontinued CheckBox的Checked属性。完成这些后,浏览页面并点击Edit button.见图9。
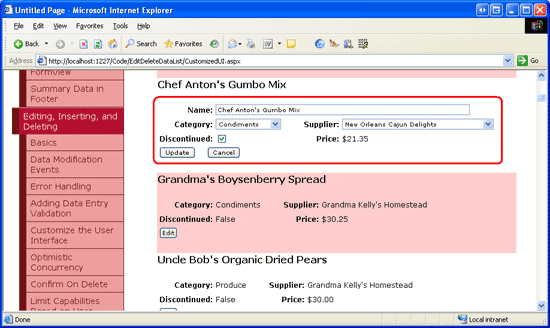
图 9: 点击Edit Button 显示编辑界面
第五步: 在UpdateCommand Event Handler保存用户的更改
当用户编辑product并点Update button后,会postback并激发UpdateCommand事件。在事件处理里,我们需要从EditItemTemplate里读出web控件的值,并和BLL交互,然后更新数据库里的product。如我们在前面一章看到的那样,被更新的product的ProductID可以通过DataKeys集合来获取。用户输入的值可以通过FindControl("controlID")来编程获取,见下面的代码:
protected void Products_UpdateCommand(object source, DataListCommandEventArgs e) { // Make sure the page is valid... if (!Page.IsValid) return; // Read in the ProductID from the DataKeys collection int productID = Convert.ToInt32(Products.DataKeys[e.Item.ItemIndex]); // Read in the product name and price values TextBox productName = (TextBox)e.Item.FindControl("ProductName"); DropDownList categories = (DropDownList)e.Item.FindControl("Categories"); DropDownList suppliers = (DropDownList)e.Item.FindControl("Suppliers"); CheckBox discontinued = (CheckBox)e.Item.FindControl("Discontinued"); string productNameValue = null; if (productName.Text.Trim().Length > 0) productNameValue = productName.Text.Trim(); int categoryIDValue = Convert.ToInt32(categories.SelectedValue); int supplierIDValue = Convert.ToInt32(suppliers.SelectedValue); bool discontinuedValue = discontinued.Checked; // Call the ProductsBLL's UpdateProduct method... ProductsBLL productsAPI = new ProductsBLL(); productsAPI.UpdateProduct(productNameValue, categoryIDValue, supplierIDValue, discontinuedValue, productID); // Revert the DataList back to its pre-editing state Products.EditItemIndex = -1; Products.DataBind(); } 代码首先检查Page.IsValid属性来确保所有的验证控件都返回合法值。如果Page.IsValid为True,从DataKeys集合里读出被编辑的product 的ProductID的值,并引用EditItemTemplate里的web控件。然后将这些控件的值读到变量里,并传给UpdateProduct方法。完成更新后,DataList会返回到编辑前的状态。
注意:我省略了某章异常处理,目的是为了使本章的代码看起来目的性更强。你可以在完成本章后自己添加异常处理的功能作为练习。
第六步: 处理空的CategoryID 和SupplierID 值
Northwind 数据库允许Products表里的CategoryID和SupplierID列为空。然而我们的编辑界面目前还没有提供可选空值。如果我们试图编辑一个
相关内容
- 在ASP.NET 2.0中操作数据之三十九:在DataList的编辑界面里添加验证控件_自学过程_
- asp.net控件DataList分页用法_实用技巧_
- 在ASP.NET 2.0中操作数据之三十八:处理BLL和DAL的异常_自学过程_
- asp.net图片文件的上传与删除方法_实用技巧_
- 在ASP.NET 2.0中操作数据之三十七:DataList批量更新_自学过程_
- asp.net中调用存储过程的方法_实用技巧_
- [翻译]Scott Mitchell 的ASP.NET 2.0数据教程_自学过程_
- 在ASP.NET 2.0中操作数据之三十六:在DataList里编辑和删除数据概述_自学过程_
- ASP.NET三层架构详解 如何实现三层架构_实用技巧_
- 详解ASP.NET验证码的生成方法_实用技巧_
点击排行
本栏推荐