您现在的位置是:网站首页> 编程资料编程资料
.NET生成动态验证码的完整步骤_实用技巧_
![]() 2023-05-24
515人已围观
2023-05-24
515人已围观
简介 .NET生成动态验证码的完整步骤_实用技巧_
前言
验证码是图片上写上几个字,然后对这几个字做特殊处理,如扭曲、旋转、修改文字位置,然后加入一些线条,或加入一些特殊效果,使这些在人类能正常识别的同时,机器却很难识别出来,以达到防爬虫、防机器人的效果。
验证码通常用于网站中,是防爬虫、防机器人侵入的好方法。以往.NET中创建验证码,通常会使用System.Drawing创建“正常”的验证码。
在前一往篇博客.NET中生成水印更好的方法中,提到了如何给图片加水印。本文将基于上篇博客进一步探索,使用Direct2D创建验证码。
传统System.Drawing的做法
前置条件:引用System.Drawing,或者安装NuGet包:System.Drawing.Common:
首先创建一个有几个文字的图片(基本操作):
byte[] GetImage(int width, int height, string text) { using (var bitmap = new Bitmap(width, height)) using (var g = Graphics.FromImage(bitmap)) { var r = new Random(); g.Clear(ColorFromHsl(r.NextDouble(), 1.0f, 0.8f, 0xff)); var brush = new SolidBrush(Color.Black); var fontSize = width / text.Length; var font = new Font(FontFamily.GenericSerif, fontSize, FontStyle.Bold, GraphicsUnit.Pixel); for (var i = 0; i < text.Length; i++) { brush.Color = ColorFromHsl(r.NextDouble(), 1.0f, 0.3f, 0xff); float x = i * fontSize; float y = r.Next(0, height - fontSize); g.DrawString(text[i].ToString(), font, brush, x, y); } // 在这里面加入一些其它效果 var ms = new MemoryStream(); bitmap.Save(ms, ImageFormat.Png); return ms.ToArray(); } }效果(Gif是由LINQPad生成多次截图而来,实际为静态图):

然后再加入一些线条:
using (var pen = new Pen(brush, 3)) { for (var i = 0; i < 4; ++i) { pen.Color = ColorFromHsl(r.NextDouble(), 1.0f, 0.4f, 0xff); var p1 = new Point(r.Next(width), r.Next(height)); var p2 = new Point(r.Next(width), r.Next(height)); g.DrawLine(pen, p1, p2); } }效果(Gif是由LINQPad生成多次截图而来,实际为静态图):

还能做什么?
很遗憾,还有很多可以做,即使是加入线条,机器依然能轻而易举地识别出来。
不过Edi.Wang在他的博客中也发布了一个生成验证码的NuGet包:Edi.Captcha,截止目前最新版是1.3.1:
这个包基于System.Drawing,加入了扭曲效果,加入了一些随机的x坐标偏移,极大地增加了AI识别的难度。
使用方式:
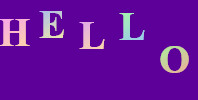
CaptchaResult result = CaptchaImageGenerator.GetImage(200, 100, "HELLO");
其中CaptchaResult的定义如下:
public class CaptchaResult { public string CaptchaCode { get; set; } public byte[] CaptchaByteData { get; set; } public string CaptchBase64Data => Convert.ToBase64String(CaptchaByteData); public DateTime Timestamp { get; set; } }生成的效果如下(Gif是由LINQPad生成多次截图而来,实际为静态图):

Direct2D
在前一篇博客中,已经有了Direct2D的相关简介。这里将不再介绍。
首先从最简单的图片上写文字开始:
byte[] SaveD2DBitmap(int width, int height, string text) { using var wic = new WIC.ImagingFactory2(); using var d2d = new D2D.Factory(); using var wicBitmap = new WIC.Bitmap(wic, width, height, WIC.PixelFormat.Format32bppPBGRA, WIC.BitmapCreateCacheOption.CacheOnDemand); using var target = new D2D.WicRenderTarget(d2d, wicBitmap, new D2D.RenderTargetProperties()); using var dwriteFactory = new SharpDX.DirectWrite.Factory(); using var brush = new SolidColorBrush(target, Color.Yellow); var r = new Random(); target.BeginDraw(); target.Clear(ColorFromHsl(r.NextFloat(0, 1), 1.0f, 0.3f)); var textFormat = new DWrite.TextFormat(dwriteFactory, "Times New Roman", DWrite.FontWeight.Bold, DWrite.FontStyle.Normal, width / text.Length); for (int charIndex = 0; charIndex < text.Length; ++charIndex) { using var layout = new DWrite.TextLayout(dwriteFactory, text[charIndex].ToString(), textFormat, float.MaxValue, float.MaxValue); var layoutSize = new Vector2(layout.Metrics.Width, layout.Metrics.Height); using var b2 = new LinearGradientBrush(target, new D2D.LinearGradientBrushProperties { StartPoint = Vector2.Zero, EndPoint = layoutSize, }, new GradientStopCollection(target, new[] { new GradientStop{ Position = 0.0f, Color = ColorFromHsl(r.NextFloat(0, 1), 1.0f, 0.8f) }, new GradientStop{ Position = 1.0f, Color = ColorFromHsl(r.NextFloat(0, 1), 1.0f, 0.8f) }, })); var position = new Vector2(charIndex * width / text.Length, r.NextFloat(0, height - layout.Metrics.Height)); target.Transform = Matrix3x2.Translation(-layoutSize / 2) * // 文字旋转和扭曲效果,取消注释以下两行代码 // Matrix3x2.Skew(r.NextFloat(0, 0.5f), r.NextFloat(0, 0.5f)) * // Matrix3x2.Rotation(r.NextFloat(0, MathF.PI * 2)) * Matrix3x2.Translation(position + layoutSize / 2); target.DrawTextLayout(Vector2.Zero, layout, b2); } // 其它效果在这里插入 target.EndDraw(); using (var encoder = new WIC.BitmapEncoder(wic, WIC.ContainerFormatGuids.Png)) using (var ms = new MemoryStream()) { encoder.Initialize(ms); using (var frame = new WIC.BitmapFrameEncode(encoder)) { frame.Initialize(); frame.SetSize(wicBitmap.Size.Width, wicBitmap.Size.Height); var pixelFormat = wicBitmap.PixelFormat; frame.SetPixelFormat(ref pixelFormat); frame.WriteSource(wicBitmap); frame.Commit(); } encoder.Commit(); return ms.ToArray(); } }使用方式:
byte[] captchaBytes = SaveD2DBitmap(200, 100, "Hello");
效果(Gif是由LINQPad生成多次截图而来,实际为静态图):
可以注意到,Direct2D生成的文字没有System.Drawing那样的锯齿。
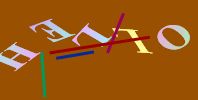
如果取消里面的两行注释,可以得到更加扭曲和旋转的效果(Gif是由LINQPad生成多次截图而来,实际为静态图):

然后加入线条:
for (var i = 0; i < 4; ++i) { target.Transform = Matrix3x2.Identity; brush.Color = ColorFromHsl(r.NextFloat(0,1), 1.0f, 0.3f); target.DrawLine( r.NextVector2(Vector2.Zero, new Vector2(width, height)), r.NextVector2(Vector2.Zero, new Vector2(width, height)), brush, 3.0f); }效果(Gif是由LINQPad生成多次截图而来,实际为静态图):
Direct2D的骚操作
Direct2D中内置了许多特效,如阴影(Shadow)等,这里我们需要用到的是位移特效(Displacement)和水流特效(Turbulence),为了实现特效,需要加入一个Bitmap层,整体代码如下:
byte[] SaveD2DBitmap(int width, int height, string text) { using var wic = new WIC.ImagingFactory2(); using var d2d = new D2D.Factory(); using var wicBitmap = new WIC.Bitmap(wic, width, height, WIC.PixelFormat.Format32bppPBGRA, WIC.BitmapCreateCacheOption.CacheOnDemand); using var target = new D2D.WicRenderTarget(d2d, wicBitmap, new D2D.RenderTargetProperties()); using var dwriteFactory = new SharpDX.DirectWrite.Factory(); using var brush = new D2D.SolidColorBrush(target, Color.Yellow); using var encoder = new WIC.PngBitmapEncoder(wic); // PngBitmapEncoder using var ms = new MemoryStream(); using var dc = target.QueryInterface(); using var bmpLayer = new D2D.Bitmap1(dc, target.PixelSize, new D2D.BitmapProperties1(new D2D.PixelFormat(SharpDX.DXGI.Format.B8G8R8A8_UNorm, D2D.AlphaMode.Premultiplied), d2d.DesktopDpi.Width, d2d.DesktopDpi.Height, D2D.BitmapOptions.Target)); var r = new Random(); encoder.Initialize(ms); D2D.Image oldTarget = dc.Target; { dc.Target = bmpLayer; dc.BeginDraw(); var textFormat = new DWrite.TextFormat(dwriteFactory, "Times New Roman", DWrite.FontWeight.Bold, DWrite.FontStyle.Normal, width / text.Length); for (int charIndex = 0; charIndex < text.Length; ++charIndex) { using var layout = new DWrite.TextLayout(dwriteFactory, text[charIndex].ToString(), textFormat, float.MaxValue, float.MaxValue); var layoutSize = new Vector2(layout.Metrics.Width, layout.Metrics.Height); using var b2 = new D2D.LinearGradientBrush(dc, new D2D.LinearGradientBrushProperties { StartPoint = Vector2.Zero, EndPoint = layoutSize, }, new D2D.GradientStopCollection(dc, new[] { new D2D.GradientStop{ Position = 0.0f, Color = ColorFromHsl(r.NextFloat(0, 1), 1.0f, 0.8f) }, new D2D.GradientStop{ Position = 1.0f, Color = ColorFromHsl(r.NextFloat(0, 1), 1.0f, 0.8f) }, })); var position = new Vector2(charIndex * width / text.Length, r.NextFloat(0, height - layout.Metrics.Height)); dc.Transform = Matrix3x2.Translation(-layoutSize / 2) * Matrix3x2.Skew(r.NextFloat(0, 0.5f), r.NextFloat(0, 0.5f)) * //Matrix3x2.Rotation(r.NextFloat(0, MathF.PI * 2)) * Matrix3x2.Translation(position + layoutSize
相关内容
- 3分钟快速学会在ASP.NET Core MVC中如何使用Cookie_实用技巧_
- ASP.NET Core 3.0 gRPC拦截器的使用_实用技巧_
- ASP.NET Core 3.0使用gRPC的具体方法_实用技巧_
- .NET Core3.1编写混合C++程序_实用技巧_
- ASP.NET实现图书管理系统的步骤详解_实用技巧_
- ASP.NET MVC 开发微信支付H5的实现示例(外置浏览器支付)_实用技巧_
- 详解MVC中为DropDownListFor设置选中项的方法_实用技巧_
- 详解ASP.NET MVC 下拉框的传值的两种方式_实用技巧_
- ASP.NET Core中快速构建PDF文档的步骤分享第1/2页_实用技巧_
- 浅谈ASP.NET Core的几种托管方式_实用技巧_
点击排行
本栏推荐